You will experience a real adventure by staying with us for longer!
Here you will find useful tips for the game!


Catharine's Memories
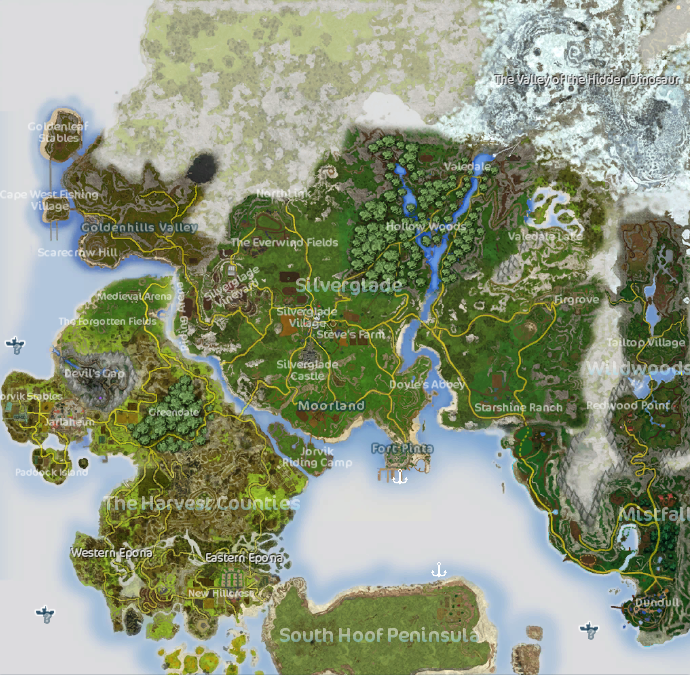
If you want, you can use our interactive map. You can mark several points with the left mouse button. With the right mouse button, you can reset.
The interactive map works only on a computer. If the map is flattened - zoom out
The memories appear as glowing butterflies, and they make sounds when you get close, making them easy to find.
Collecting all the memories in a particular area unlocks quests related to Catherine’s past and sections of her journal, where you learn about her history. Once you complete all these quests in the areas where you can currently search for memories, you will unlock the ability to search in new areas.
After finishing each area, the player and Linda will use magic to reveal a memory from the past. Once you have fully explored a memory, Linda will reward you with a piece of Catherine's Diary. You can read these diary excerpts in the Lore Library section of your collections journal.
X: 270, Y: 99
Surrounded by enchanted stones near the hidden stone circle.
X: 240, Y: 149
Among the bushes around the old summer house.
X: 253, Y: 157
Behind a concealed stone in the bushes along the west bank of the Silversong River.
X: 301, Y: 109
Go to X: 298, Y: 122 on the path to Valedale Lake, face north, and follow the trail through the bushes to reach the coordinates.
X: 296, Y: 99
Beside the tree on the right side of Avalon’s home.
X: 286, Y: 127
Concealed among the bushes on the right side of the Silversong River, just south of the championship area.
X: 281, Y: 97
On a large cliff along the path leading to the Valley of the Hidden Dinosaurs.
X: 266, Y: 120
Positioned on top of the white hatch that makes a distinctive sound.
X: 211, Y: 134
Hidden within some tall bushes.
X: 284, Y: 112
Floating in the river as you exit Valedale.
X: 17, Y: 242
Inside the stable walls, near the roses leading to Herman’s house.
X: 19, Y: 250
Behind a large rock to the east of the cow stables.
X: 19, Y: 240
Next to the gated entrance of the stables.
X: 6, Y: 238
Go to X: 13, Y: 238 and face west. Follow the exterior of the Jorvik Stables wall until you reach the coordinates.
X: 3, Y: 248
At the “Old Runestone.” Start at X: 6, Y: 253 (GED Exploration Station Alpha), face NW, and look for a path slightly submerged by water. Jump onto this path and follow it to the coordinates.
X: 24, Y: 224
North of the Jorvik Stables Championship arena, close to the path leading to the dock near Sunfield Farm.
X: 33, Y: 227
Hidden among a group of rocks to the northeast of Sunfield Farm.
X: 29, Y: 239
Behind the large rock in the northern Jarlaheim Fields, adjacent to Sunfield Farm.
X: 26, Y: 259
Behind the small mill next to the wooden bridge leading to Paddock Island.
X: 47, Y: 253
At the southern entrance to Jarlaheim from Paddock Island. Follow the path on the front right of the gate to the last house. The memory is located behind this last house.
X: 209, Y: 236
On the flat grassy area near Jasper’s Old Barn.
X: 202, Y: 246
Next to a tree close to the Moorland Championship Arena.
X: 187, Y: 253
By a tree located west of Mrs. Holsworth’s house.
X: 172, Y: 248
Floating on the small dock at the beach behind the paddock with the Bobcats.
X: 198, Y: 251
East of Mrs. Holsworth’s house, on a hill behind a rock with a patch of yellow flowers.
X: 187, Y: 231
Near Conrad’s Workshop, hidden in the bushes.
X: 158, Y: 238
At Nilmer’s Highland. Go to X: 160, Y: 236 and face southwest, then make your way down the hill to the coordinates on your left.
X: 144, Y: 224
On a hill off the road near Ydris’ Circus, hidden behind some bushes.
X: 157, Y: 223
On a hill to the right side when approaching Ydris’ Circus from Nilmer’s Highland.
X: 219, Y: 245
Located behind the lighthouse.
X: 204, Y: 376
Hidden behind three stones that form a half circle.
X: 179, Y: 377
Floating by the Stone Circle surrounding the Singing Yew.
X: 157, Y: 373
On the cliff edge of the Peninsula near the bridge to New Hillcrest.
X: 180, Y: 346
Head to X: 177, Y: 349; from here, you’ll spot the butterfly floating on the sands. (To exit this area, face southeast and move down to a small beach below. Once there, face northwest and jump to the larger beach in front of you.)
X: 291, Y: 394
Positioned behind the lighthouse.
X: 285, Y: 376
Located on South Hoof Beach near Dead Man Sands.
X: 273, Y: 366
Floating around an apple tree behind the therapy stations at the Rescue Ranch.
X: 275, Y: 353
Behind the stone stable structure underneath a large rock cliff on South Hoof Farm.
X: 242, Y: 379
Situated between a rock formation made up of five stones.
X: 256, Y: 350
Along the road that connects the farm to the port.
X: 314, Y: 49
Located at Nic Stoneground’s camp, perched on the edge of the cliff where the road descends towards the lake.
X: 323, Y: 15
Resting on a stump near the frozen road.
X: 347, Y: 18
From X: 339, Y: 16, face northeast and ascend the hill to locate the butterfly near the edge of the geyser field.
X: 332, Y: 39
On top of a snow mound in front of the dinosaur skeleton.
X: 331, Y: 50
Floating on a stump on a snowy hill in Frozen Vale Lake.
X: 343, Y: 47
Next to a large rock at the helicopter crash site.
X: 365, Y: 56
Floating by a post on the northern side of the broken bridge at the end of Ash Road leading to Ashland.
X: 382, Y: 73
In the Ice Forest near a cluster of giant boulders.
X: 383, Y: 94
Positioned in the center of the Valley of Frozen Mist, directly northwest of the ice-covered tree.
X: 394, Y: 52
In the Valley of the Frozen Mist, northeast of the entrance to the Stonecutters Vault.
X: 90, Y: 327
Situated between the gated house and the Crescent Moon Fashions store in Crescent Moon Village.
X: 79, Y: 328
Behind the horse stables in Crescent Moon Village.
X: 80, Y: 345
From X: 77, Y: 339, face south towards the flat rock in Epona Lake. Jump onto this rock, then onto the next two rocks until you reach the coordinates.
X: 65, Y: 352
From X: 66, Y: 351, face southwest. The butterfly is located below you. (You can return to the top by walking up the grassy path.)
X: 52, Y: 315
From X: 56, Y: 316 at Shipwreck Shore, face northwest and follow the small land trail to the coordinates.
X: 69, Y: 324
Located northeast of Crescent Moon Village, across the lake from the race area.
X: 101, Y: 320
From Full Moon Road leading into Crescent Moon Village, face west and look north to a rocky platform in the Epona River. The butterfly is visible in the tall river grass.
X: 109, Y: 335
From X: 110, Y: 331 in the Mirror Marshes, face south. Follow the path ahead to find the butterfly.
X: 102, Y: 338
At the Twilight Temple. From X: 116, Y: 337 at the broken bridge near The Great Thunder, face west. Follow the jutting rocks and jump to the opposite rock. Then face northwest and follow the path up to the coordinates.
X: 128, Y: 311
From X: 140, Y: 319, face northwest. Follow the path to X: 130, Y: 310. Face west and jump over the fence to reach the coordinates.
X: 318, Y: 271
In a fairy ring atop the hill to the right after turning onto Birk’s Grange road.
X: 327, Y: 319
At a concealed campsite in The Keel. From X: 332, Y: 324, face west and follow the path to find the butterfly.
X: 372, Y: 341
In a shallow area of the bay.
X: 388, Y: 348
Among the wheat field by Dundull, surrounding a scarecrow.
X: 397, Y: 327
In the orchard near Kora’s Cottage.
X: 395, Y: 313
Next to a stump on Berry Hill.
X: 388, Y: 290
Hidden in the bushes on the ledge overlooking South Mistfall Ranger Station.
X: 380, Y: 295
From X: 372, Y: 291, face northwest and follow the path up the hill until you reach the large white tree where the butterfly is floating.
X: 364, Y: 308
By the bridge leading to the Peregrine Trail.
X: 360, Y: 329
From X: 361, Y: 326 on the Peregrine Trail, face southwest and make your way down the hill to find the butterfly.
X: 120, Y: 147
Located on the hill above Jasper’s Pumpkin Farm.
X: 100, Y: 119
Near a rock along Old King’s Road by the Shadowy Hills.
X: 86, Y: 115
Hovering around a magpie on Old King’s Road, close to the stone bridge.
X: 89, Y: 97
In the center of Aideen’s Whisper, within a shallow ditch.
X: 77, Y: 110
Floating on the road at Hussar’s Drop.
X: 66, Y: 119
By a large stone adorned with candles at Hussar’s Drop. Go to X: 67, Y: 114, face southwest, and walk through the bushes to find the butterfly.
X: 49, Y: 100
At Smuggler’s Roost. From X: 46, Y: 101, face northeast. Jump across the gap to find the butterfly at the coordinates.
X: 38, Y: 71
Circling a runestone on Goldenleaf Island.
X: 76, Y: 150
From X: 79, Y: 147, jump over the fence and follow the path down to the butterfly.
X: 85, Y: 133
In the heart of Goldenleaf Forest.
X: 78, Y: 188
On a hill encircled by five runestones.
X: 89, Y: 192
Across a small wooden bridge; find it behind the cottage.
X: 84, Y: 180
In a circle of rocks within the Forgotten Fields.
X: 99, Y: 184
On a bridge spanning the Silversong River, behind the Riding Arena.
X: 86, Y: 167
Floating near an unlit campfire on a tall, narrow hill with a single runestone.
X: 76, Y: 164
From X: 78, Y: 166, follow the path down to the Secret Smuggler’s Place on the Forgotten Fields coast.
X: 58, Y: 178
Along the Forgotten Fields coast, past a large dead tree stump, flying around a rune stone surrounded by trees and flowers.
X: 56, Y: 194
In a cleft within a rocky hill.
X: 52, Y: 208
Circling a rock at the base of a rocky cliff.
X: 41, Y: 199
Hovering around a runestone near The Ancient Tree (The Sleeping Widow).
X: 181, Y: 186
Behind Big Bonny’s house.
X: 182, Y: 208
In a small paved clearing just below Silverglade Castle.
X: 173, Y: 191
Floating by a tree in the wheat field west of Silverglade Village, near the Silverglade Championship arena.
X: 172, Y: 164
Hovering by a large rock in the middle of the potato field north of Marley’s Farm.
X: 203, Y: 172
Circling above a small hill with a picnic area next to Will’s Mill.
X: 217, Y: 184
Among a circle of trees by a bush in the field across from Barney’s silo.
X: 198, Y: 202
In a clearing directly behind three large rocks near Steve’s Farm.
X: 190, Y: 200
Flying around the runestone southwest of Steve’s Farm.
X: 188, Y: 178
Behind the swing sets at the house at the north end of Silverglade Village (Post Silverglade Village update).
X: 175, Y: 198
Floating on a hill behind Daxton’s pink house in Silverglade.
X: 132, Y: 278
In the Guardian’s Dale, northwest of the stairs.
X: 153, Y: 264
At the Soul Riders’ Campsite near Guardian’s Dale, floating next to the outhouse.
X: 120, Y: 291
Halfway down the trail leading to The Cauldron.
X: 146, Y: 285
Circling around a tree along The Eastern Trail.
X: 166, Y: 281
Flying around a tree in the orchard at Dew’s Farm.
X: 151, Y: 262
In a bush on the hill to the right, immediately after the gate (traveling from Wolf Hall Inn) leading to the Eastern Slopes.
X: 176, Y: 279
Near a tree overlooking Moorland Stables, just north of Dew’s Farm.
X: 175, Y: 300
On a rock looking towards Fort Pinta and South Hoof, south of Dew’s Farm.
X: 163, Y: 313
At the edge of the Mirror Marshes near Dew’s Farm, down the hill from the Druid Portal.
X: 147, Y: 306
Floating around a tree on a hill southeast of Dew’s Old Paddock.
X: 242, Y: 236
On the top tier of the Abbey, to the right behind a memorial stone, circling over pink flowers.
X: 239, Y: 238
On the second tier to the right of the Abbey, circling around a memorial stone on the edge of the cliff.
X: 245, Y: 235
Circling a memorial stone with candles and a tree stump with a lantern along the back of the second tier of the hill.
X: 249, Y: 229
By a tree near the small bridge in The Thorn Rocks area, just before reaching The Pony Race.
X: 240, Y: 229
Circling a dead bush and tree stump on the left side of the second tier of the Abbey’s hill.
X: 239, Y: 227
On the left side of the hill on the second tier, circling a memorial stone next to a wooden bench.
X: 236, Y: 232
On the left side of the entrance to the Abbey, by the tree stump with a bird.
X: 238, Y: 230
Along the left stone wall of the Abbey, circling above mushrooms.
X: 243, Y: 231
On the top tier of the Abbey on the left side, circling a stone pillar.
X: 243, Y: 235
Around the right side of the Abbey on the top tier, next to the window.